Thanks to a torn bicep, a hernia, and
rheumatoid arthritis, I decided to try yoga as a way to
alleviate my daily pain and fatigue. I'm combining this
with my
Strength Training Workout.
I'm still putting in 8-10 hour days up in our mountain
doing farming and forest maintenance. Although this
constitutes being active, it's certainly not the same as a
focused weight training or yoga workout.
I was looking for a way to simply feel better without all of
the spiritual mumbo jumbo usually associated with practicing
yoga. Maybe the meditation and all that will come later, but
for now, I'm only looking for a way to improve my physical
condition. Most of the yoga sites and videos I found weren't
what I was looking for and then I found a website called
Verywell Fit, which explains basic yoga in very simple
terms. Much more about Verywell Fit (numerous links below)
throughout this page.
I'm the type who really likes structure in everything I do,
and that includes working out and now yoga. Every thing I
read had a different order for asanas (poses) and different
schools of thought about yoga in general. I made this page
for my benefit to put some order to all the information out
there and make it easier for me to get motivated.
Hey you know my family actually laughed at the prospect of
me doing yoga which even motivated me more to embark on this
seemingly impossible journey. This is a page in progress and
a huge learning curve for me, someone who is usually full of
energy and prefers moving to sitting still. Even the thought
of sitting in one position for more than a few seconds seems
like quite a stretch (excuse the pun) for me. Anyway, for
the sake of my deteriorating health....here goes....wish me
luck!
What
is yoga?
Yoga is a group of physical, mental, and spiritual practices
or disciplines which originated in ancient India and are
used to control and still the mind. There is a wide variety
of of yoga schools, practices, and goals.
The ultimate goals of yoga are stilling the mind and gaining
insight, resting in detached awareness, and liberation (Moksha)
from saṃsāra and duḥkha: a process (or discipline) leading
to unity (Aikyam) with the divine (Brahman) or with one's
self (Ātman). This goal varies by philosophical or
theological system. In the classical Astanga yoga system,
the ultimate goal of yoga is to achieve samadhi and remain
in that state as pure awareness.
(Wikipedia: Yoga)
Yoga Practices
There are many yoga practices to choose from....these are
the most common and include links to Verywell Fit if you
want more detailed information. (links open in a new tab)
Ashtanga: Ashtanga yoga has participating yogis follow
any one of six sequences. This yoga style has a determined
order, which teachers help lead in class.
Bikram: Bikram yoga consists of 26 set postures and two
pranayama breathing exercises all of which are performed in
a heated room.
Hatha: Hatha yoga is a gentle yoga that includes static
poses, and places an importance on breathing and meditation.
Restorative: Restorative yoga is a freestyle yoga practice that
focuses on stretching the body. There are no set poses or
required series.
Power: Power yoga is related to both Ashtanga and vinyasa
yoga, and teachers have the freedom to select the order of
poses. You can expect each class to be different.
Vinyasa: In Vinyasa yoga—also known as "flow"—poses flow
from one to another. This is a more freestyle approach where
you can adjust the sequence of flows in each practice.
Know
Your Target Areas
I included this graphic on my
Strength Training Workout
page and decided it might be useful here as well.
The first thing you need to do is get to know the areas you
plan to target in your yoga workouts. The picture shows most
of the minor and major groups you will target in a typical
workout.
A Word About Verywell Fit
The Verywell Fit website explains things in very simple terms. All
information is reviewed by their staff, which includes a
group of certified professionals in a variety of fields.
This seemed like a much better place to learn yoga than from
some unknown dude or dudette online. The sites and videos I
found to date were either too spiritual or way too high
tension. Verywell Fit gave me exactly what I was looking
for. I am linking to many of their pages and graphics for my
personal use. Each link opens up to a new tab in your
browser. I wanted to embed their graphics directly on this
page but I would obviously need to get permission, or
otherwise be guilty of copyright infringement. BTW I am not
receiving anything for endorsing their site. I am simply
giving credit where credit is due.
THOUGHTS
- Comedy Trump Memes Trump President Again, WTF !!!!!!!! . Anyway, this is a collection of Trump memes
from 2024.
My Yoga Workout Choice
Well here goes. Due to my diminished physical condition, I
was planning to engage in
Restorative Yoga which seems to involve mostly
stretching and probably the best choice for someone with
joint issues. The problem is, it might be a little too sedate
for me. I decided to dive right in and do the
Verywell Fit 31 Yoga Poses for Beginners. I am hoping to progress to
Hatha Yoga at some point and possibly work my way
towards
Vinyasa Yoga. I guess we'll see how things progress.
It is now the first day of Spring,
March 19, 2024, and this is officially the beginning of my
yoga training. woohoo.
Standing
poses - Standing poses are often done first in a
yoga class to "build heat" and warm you up. In vinyasa/flow
style yoga, standing poses are strung together to form
long sequences. In Hatha classes, you may do the
standing poses individually with rest between each pose.
Balancing
poses - Beginners' balances are an important way
to build the core strength necessary for many of yoga's
more advanced postures. Though balances may seem
difficult at first, you will find that you can improve
markedly with regular practice.
Backbends
- As a beginner, you will generally begin with gentle
spine flexion and extension, eventually moving to deeper
bends. Since you rarely move like this in daily life,
backbends are essential for spinal health and longevity.
Seated poses
- Seated stretches, which often focus on stretching the
hips and hamstrings, are usually done toward the end of
a yoga class after the body is warm. Placing a folded
yoga blanket or a block under your seat is an excellent
way to make yourself more comfortable in these postures.
Resting or
supine poses - It's essential to get to know your
resting poses, especially child's pose, which you are
encouraged to do whenever you need a break during a yoga
session. These resting poses continue the hip and
hamstring work of the seated poses and provide gentle
back-bending, twisting, and inversion.
Note: The following poses
and information shown on this page are for my own personal
yoga training and workout. The instructions for each pose
and the thumbnail images are all from Verywell Fit and
constitute
fair use of same under copyright laws. For each of the poses, a link to the Verywell Fit page
for the pose is listed. I highly recommend that you visit the
page for each pose, especially if you're a beginner like me,
for the following information:
Instructions
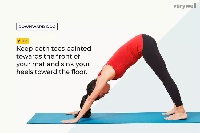
- You can do this pose anywhere you can lay out a yoga
mat.
Come to your hands and knees with
your wrists underneath the shoulders and your knees
underneath the hips.
Curl your toes under and push back
through your hands to lift your hips and straighten your
legs.
Spread your fingers and ground down
from the forearms into the fingertips.
Outwardly rotate your upper arms to
broaden the collarbones.
Let your head hang and move your
shoulder blades away from your ears towards your hips.
Engage your quadriceps strongly to
take the burden of your body's weight off your arms.
This action goes a long way toward making this a resting
pose.
Rotate your thighs inward, keep your
tail high, and sink your heels towards the floor.
Check that the distance between your
hands and feet is correct by coming forward to a plank
position. The distance between the hands and feet should
be the same in these two poses. Do not step the feet
toward the hands in Down Dog in order the get the heels
to the floor.
Exhale and bend your knees to
release and come back to your hands and knees.
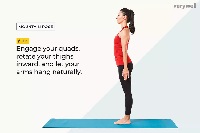
Instructions
- Come to a stand with your big toes touching.
Lift up all of your toes and fan
them out, then drop them back down to create a wide,
solid base. You can separate your heels slightly if your
ankles are knocking together uncomfortably.
Let your feet and calves root down
into the floor.
Engage your quadriceps (the muscles
on the front of your thighs) and draw them upward,
causing your kneecaps to rise.
Rotate both thighs inward, creating
a widening of the sit bones.
Maintain the natural curves of your
spine.
Tone your belly, drawing it in
slightly.
Widen your collarbones and check
that your shoulders are stacked over your pelvis.
Shrug your shoulders up to your ears
and then roll them back to release your shoulder blades
down your back.
Let your arms hang naturally with
the elbows slightly bent and the palms facing forward.
Your neck is long, your chin is
neither tucked down nor lifted up, and the crown of your
head rises toward the ceiling.
Once you have checked all your
alignment points, take 5 to 10 breaths while you hold
yourself in this position.
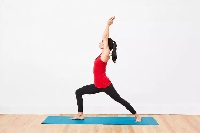
From Downward Facing Dog, step your
right foot forward to the inside of your right hand.
Pivot on the ball of your left foot
and drop your left heel to the floor with your toes
turned out about 45 degrees from the heel.
Bend your right knee directly over
your right ankle so that your right thigh is parallel to
the floor.
Rise to standing, bringing your arms
out to the side and up toward the ceiling. Your chest
stays open as you come into a slight spinal extension
(also known as a backbend).
Your palms can touch overhead or
stay shoulder's distance apart, whichever is more
comfortable.
Lift your gaze up toward your thumbs
and slide your shoulder blades down the back.
Check the alignment of your hips.
Draw your right hip back and your left hip forward so
that both hips are squared to the front of your mat.
Ground down through the outer edge
of your left foot. Make sure your right thigh is still
as parallel to the floor as possible.
Drop your hands to your mat and step
your right leg back to Downward Dog. Take a few breaths
or move through a vinyasa before doing the left side.
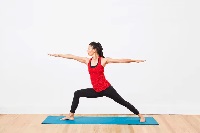
Instructions
- You may begin in Mountain Pose (Tadasana) facing the
long way on the mat. You will need to modify these
instructions accordingly if you are starting from
Downward Facing Dog or Warrior II.
Exhale and step your left foot
behind towards the back of the mat with front foot
staying at the top.
Lift and extend your arms out
horizontally from your sides, with palms down.
Angle your right heel toward the
center of your mat. Opinions vary on the ideal angle for
the foot in relation to the ankle. Somewhere between 90
(which would be parallel to the back edge of your yoga
mat) and 45 (toes pointing at the top left corner of
your mat) degrees is acceptable.
Bend your right knee so that your
calf and thigh form a right angle with your thigh
parallel to the floor.
Rest your right forearm on the right
thigh with the palm turned up towards the ceiling. If
you'd like to deepen the stretch, bring your right hand
inside or outside the right foot, depending on which is
more comfortable.You can place the right fingertips on
the floor for added length and to also avoid dumping the
weight in the shoulder. A block underneath the hand is
also welcomed. Remember to lift the weight out of the
shoulder while engaging the core for support.
Lift your left arm up and extend it
over the ear. Reach through finger tips while pressing
firmly into the pinky toe side of the back foot.
Open your chest and make sure your
left shoulder is aligned over your right shoulder.
Bring your gaze up toward your left
hand.
Lift the torso up on an inhale
extending arms wide. Pivot the feet and torso to face
the top of the mat and step forward, returning to
tadasana.
To keep the body in balance, repeat
the pose with your left foot forward.
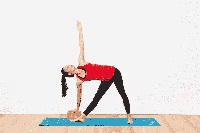
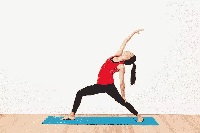
Instructions
- There are many ways to come into Triangle. Entering
from Warrior II works well because your feet are already
in the correct position. You shouldn't need to widen or
narrow your stance for this transition. So, from Warrior
II, straighten your front leg (the right leg in this
case).
Engage your right thigh muscles and
draw your right femur into its socket. Extend your right
hand toward the front of the room, keeping your right
hip tucked.
Lower your right hand down, onto
your shin or ankle. If you are more open, bring your
right hand to the floor on the inside or on the right
foot. Do whichever one feels most comfortable.
The left shoulder stacks on top of
the right one as you open your chest, reaching your left
fingertips toward the ceiling while keeping your left
shoulder rooted in its socket.
Turn your head to take your gaze up
toward your left fingertips. If this is uncomfortable
for your neck, it's also fine to keep the head in a more
neutral position.
Continue to draw your right thigh
muscles upward, deepening the crease in your right hip.
Soften your right knee slightly to
prevent hyperextension. (This is called a microbend.)
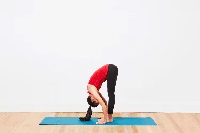
From Raised Hands Pose (Urdhva
Hastasana) with the arms reaching overhead, sweep your
arms down on either side of your body to come into a
forward fold from your hips. This is often called a Swan
Dive.
Bring your fingertips in line with
the toes. Press your palms flat to the mat if you can.
You can use blocks under your hands here if they don't
reach the floor.
Microbend the knees so that they are
not locked.
Engage your quadriceps muscles and
draw them up. The more you use your quads, the more the
hamstrings (the muscles on the back of the thighs) will
open.
Bring your weight a little bit
forward into the balls of your feet so that your hips
stay over your ankles.
Let your head hang.
To come up, inhale and place your
hands onto your hips. Press your tailbone down and
contract your abdominal muscles as you rise up slowly.
Come to stand with your feet about
mat's width apart.
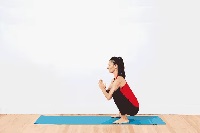
Bend the knees and lower your butt
toward the floor to come into a squat.
It's natural for your toes to want
to turn out and that's OK, but don't overdo it.
Eventually, you're working toward keeping the feet
closer to parallel.
Take your upper arms inside your
knees and bend the elbows to bring the palms together
into anjali mudra (prayer position).
With hands to your heart center in
anjali mudra, see if you can allow your thumbs to touch
your sternum as if to help keep the chest lifted.
Continue pressing upper arms into thighs and thighs into
upper arm to stay engaged.
Keep your spine straight, your butt
moving toward the floor, and your shoulders relaxed away
from your ears.
Stay here for five breaths, then
straighten the legs to come out. You can come directly
into a Forward Fold if you like.
Try repeating the pose three times
to take full advantage of getting warmed up. If you are
practicing at home, it's fine to do some other poses in
between your squats.
From Raised Hands Pose (Urdhva
Hastasana) with the arms reaching overhead, sweep your
arms down on either side of your body to come into a
forward fold from your hips. This is often called a Swan
Dive.
Bring your fingertips in line with
the toes. Press your palms flat to the mat if you can.
You can use blocks under your hands here if they don't
reach the floor.
Microbend the knees so that they are
not locked.
Engage your quadriceps muscles and
draw them up. The more you use your quads, the more the
hamstrings (the muscles on the back of the thighs) will
open.
Bring your weight a little bit
forward into the balls of your feet so that your hips
stay over your ankles.
Let your head hang.
To come up, inhale and place your
hands onto your hips. Press your tailbone down and
contract your abdominal muscles as you rise up slowly.
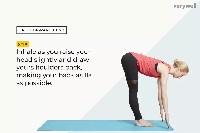
From Downward-Facing Dog (Adho Mukha
Svanasana), bring your right foot forward to the inside
of your right hand.
Come up to your fingertips.
Step your left foot forward about a
foot. Turn your left toes out slightly and lower your
left heel so that the sole of your foot is flat on the
mat.
Straighten your right leg.
Lift your torso to a standing
position.
Put both hands on your hips to make
sure that your hip points are facing towards the front
of the mat.
Inhale to lengthen the spine.
On the next exhale, deepen your
right hip crease as you come into a forward bend over
your right leg. Keep a flat back as you lower yourself.
When you come to your full extension, it's OK to let the
spine round a bit. Lower your hands to the floor. Stay
on your fingertips or flatten your palms to the floor.
On each inhale, lengthen the spine.
You can even come up to a flat back on the inhales. On
each exhale, take the forward bend a little deeper. Keep
drawing the right hip back to keep your hips squared.
Microbend your right knee so it's not locked. Stay for
around five breaths.
To keep the body in balance, repeat
on the left side.
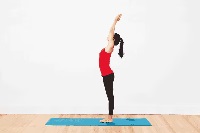
From Mountain Pose (Tadasana),
inhale to bring your arms out to the sides and up toward
the ceiling.
Keep your arms parallel or bring
your palms together overhead only if you can do so
without hunching up your shoulders. If your palms are
apart, keep them facing each other. Your arms should be
very straight and your hands active all the way through
the fingertips. Take your gaze (drishti) up toward your
thumbs.
Slide your shoulders away from your
ears with a focus on broadening through your collar
bones. If you feel like your ribs are jutting forward or
pulling apart, knit them back together. Keep your thigh
muscles strongly engaged so that they draw the kneecaps
up.
With arms above head, root into your
feet as you lift through the crown of your head. Gently
pull the navel towards spine while keeping a lift
through the sternum.
Instructions
- Prior to doing this, warm up to avoid overstretching a
cold muscle. Great ways to warm up include jumping
jacks, skipping, side-stepping, running in place, or any
dynamic movements that mimic whatever sport you do.
Given that this targets the lower half of your body,
it's best to choose movements that will make the muscles
in the groin and inner thigh areas warm and pliable.
Stand in a split stance with your
right front forward and your left foot straight back.
Bend your right knee so that it is at about a 90-degree
angle. This should put you into a forward lunge
position. Place your hands on your forward knee. Keep
your shoulders relaxed, your hips even, your chest open,
and your gaze straight ahead.
Press down with your hands and drive
the hips forward until you feel a stretch from the front
of your hip, groin, and thigh on your left side.
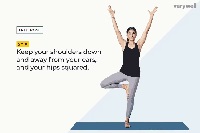
Instructions
- Come to stand in Mountain Pose (Tadasana) with your
hands in Anjali mudra at your heart center.
Take a moment to feel both your feet
root into the floor, your weight distributed equally on
all four corners of each foot.
Begin to shift your weight into your
right foot, lifting your left foot off the floor. Keep
your right leg straight but don't lock the knee.
Bend your left knee and bring the
sole of your left foot high onto your inner right thigh.
Press your foot into your thigh and
your thigh back into your foot with equal pressure. This
will help you keep both hips squared toward the front so
your right hip doesn't jut out.
Focus your gaze (Drishti) on
something that doesn't move to help you keep your
balance.
Take 5 to 10 breaths, then lower
your left foot to the floor and do the other side.
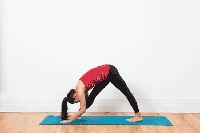
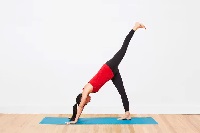
Instructions
- Variation for increased intensity, round the spine and
tuck your chin as you bring your shoulders over your
wrists and your right knee to your nose on an
exhalation. Inhale and return to down dog split.
Raise the right leg to down dog
split.
Keep your hips level and the right
foot strongly flexed.
Repeat this motion up to three
times.
After several breaths, step the
right foot to the front of your mat.
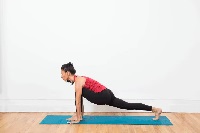
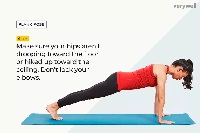
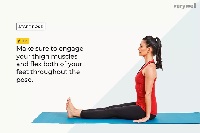
Instructions - Select a position
where you can extend your whole body length. Using an
exercise mat will give you enough padding to be
comfortable on all fours. You can choose whether to
perform a plank on your palms or your forearms, as shown
in the video. A variety of wrist wraps are available to
provide joint support.
Begin in the plank position, face
down with your forearms and toes on the floor. Your
elbows are directly under your shoulders and your
forearms are facing forward. Your head is relaxed and
you should be looking at the floor.
Engage your abdominal muscles, drawing your navel toward
your spine. Keep your torso straight and rigid and your body
in a straight line from your ears to your toes with no
sagging or bending. This is the neutral spine position.
Ensure your shoulders are down, not creeping up toward your
ears. Your heels should be over the balls of your feet.
Hold this position for 10 seconds. Release to floor.
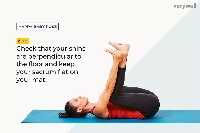
Instructions
- You can perform Cat-Cow on an exercise mat or on a
carpeted floor.
Repeat the Cat-Cow Stretch on each inhale and exhale,
matching the movement to your own breath.
Continue for 5 to 10 breaths, moving the whole spine. After
your final exhale, come back to a neutral spine.
Starting Position: All Fours
Start on your hands and knees, aligning your wrists
underneath your shoulders and your knees underneath your
hips.
Think of the spine as a straight line connecting the
shoulders to the hips. Try visualizing the line extending
forward through the crown of the head and back through the
tailbone. This is the position of a neutral spine.
Keep the neck long by looking down
and out.
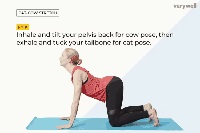
Inhale and Arch for Cow Pose
Curl your toes under.
Tilt your pelvis back so that your tailbone sticks up.
Let this movement ripple from your tailbone up your spine so
that your neck is the last thing to move.
Your belly drops down, but keep your abdominal muscles
hugging your spine by drawing your navel in.
Take your gaze gently up toward the ceiling without cranking
your neck.
Exhale and Round for Cat Pose
Release the tops of your feet to the floor.
Tip your pelvis forward, tucking your tailbone. Again, let
this action move up your spine. Your spine will naturally
round.
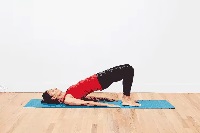
Instructions
-
Find an open space on the floor and lie on your back, using
a mat if you have one. Rest your hands at your sides, bend
your knees, and place your feet flat on the floor, beneath
your knees.
Tighten your abdominal and buttock muscles by pushing your
low back into the ground.
Raise your hips to create a straight line from your knees to
your shoulders.
Squeeze your core and pull your
belly button back toward your spine.
Hold for 20 to 30 seconds.
Lower the hips to return to the starting position.
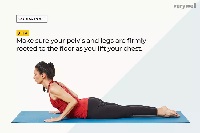
Instructions
-
If you're in the middle of a Sun Salutation, you'll be
coming into Cobra from Knees, Chest, and Chin. If not, you
can begin by lying down flat on your stomach.
Exhale to release back to the floor (or push back to
Downward Facing Dog, Adho Mukha Svanasana, if you are doing
a Sun Salutation).
Place your palms flat on the ground directly under your
shoulders. Bend your elbows straight back and hug them into
your sides.
Pause for a moment looking straight down at your mat with
your neck in a neutral position. Anchor your pubic bone to
the floor.
Inhale to lift your chest off the floor. Roll your shoulders
back and keep your low ribs on the floor. Make sure your
elbows continue hugging your sides. Don't let them wing out
to either side.
Keep your neck neutral. Don’t crank it up. Your gaze should
stay on the floor.
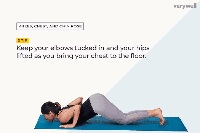
From Plank position, drop your knees to the floor. Breathe
smoothly throughout the pose.
Lower your chest and chin down to the floor, landing your
shoulders right over your hands. Keep your elbows hugging
into your sides. Your butt stays high and your toes stay
tucked under. You'll be scrunched up like an inchworm.
Hold the pose for one to five breaths.
To exit the pose, lift your chin and slide your chest
through your hands as you untuck your toes and straighten
your legs to arrive in a Low Cobra, which is the next pose
in the sun salutations.
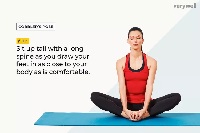
Instructions
-
Grab a yoga mat or towel if you need extra padding on a hard
floor.
Sit with your legs extended straight in front of you. Sit on
your sit bones as much as possible. To that end, take hold
of the flesh of each buttock and move it out of the way.
This results in a much more grounded feeling.
Engage your thigh muscles and flex both feet. Your heels may
come up off the floor, but do your best to keep them rooted
on the mat for engagement. Bend at the knees if needed.
Stack the shoulders directly on top of the hips. Release
your shoulders away from your ears.
Hold your arms straight and palms flat on the floor on
either side of your hips to support your spine. However, arm
lengths vary so there is some discretion to bend your arms
slightly or shift the placement of your palms.
Inhale to lengthen your spine.
Stay, if possible, for five deep breaths with the legs fully
active.
Instructions
-
Begin seated in Staff Pose (Dandasana) with your legs
outstretched straight in front of you.
Bend your knees and bring the soles of your feet together as
you let your knees fall out to either side.
Draw your feet in as close to your body as is comfortable.
Back off if you feel any pain in your knees.
Press the outer edges of your feet together strongly. The
feet may begin to open like a book. You can encourage this
with your hands or hold onto your big toes in a yogi toe
lock.
Sit up tall with a long spine while keeping your shoulder
blades on your back and your shoulders moving away from your
ears.
Arrange supportive padding (blanket, block, or bolster)
under your sit bones so your hips will be higher than your
knees when you come into the pose.
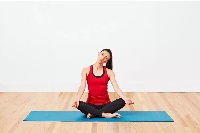
Come to sit on your padding in a comfortable, cross-legged
position. Shift the flesh of your butt to each side with
your hands so that your sit bones have a firm foundation.
Lean back and forth and side to side
with your torso a few times to make sure your shoulders
are aligned directly over your hips. Slide the shoulder blades down your back so your
shoulders move away from your ears. The crown of your head
should rise towards the ceiling.
Your hands can rest in your lap or on the tops of your
thighs. Turn your palms up to be receptive or down to feel
grounded.
On your inhalations, feel your spine grow long. On your
exhalations, root down through your seat.
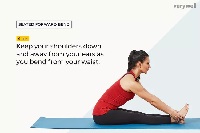
24. Half Lord of the Fishes Pose (Ardha
Matsyendrasana)
Instructions
-
Begin sitting in Staff Pose (Dandasana) with both legs
outstretched in front of you.
Adjust the flesh under your seat so that your sit bones are
firmly anchored.
Bend your left knee and bring the sole of your left foot to
your right inner thigh.
Square your torso over your extended right leg. Begin to
bring your torso down to your leg by tipping your pelvis
forward and walking your hands which are framing your
extended leg towards your right foot so that the bend
initiates from your hips instead of your lower back.
Keep your right foot flexed while pressing the back of the
right thigh down toward the floor.
When you reach your maximum forward bending limit, you have
a choice: You can maintain your straight spine and long neck
in an active position, or you can relax your heart and head
down toward the extended leg, allowing the spine to round.
Do whichever one feels better.
If your hands reach your foot, hold your foot. If not, you
may hold on to your ankle or calf, or place your hands on
the floor wherever they reach.
On each inhale, extend the spine long. On each exhale,
deepen the forward bend.
Stay here for five to 10 breaths and then straighten both
legs, shake them out, and repeat the pose on the other side.
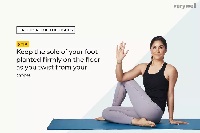
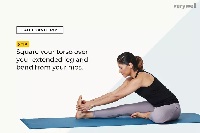
Instructions
-
Begin by coming to sit in Staff Pose (Dandasana) with your
legs straight in front of your body.
Bring your arms straight out to the sides and up over your
head, reaching toward the ceiling.
Inhale and draw your spine up long.
As you exhale, begin to come forward, hinging at your hips.
Imagine your pelvis as a bowl of water that is tipping
forward.
On each inhale, lengthen your spine. You may come a bit out
of your forward bend to do this.
On each exhale, deepen into your forward bend. Imagine your
belly coming to rest on your thighs, rather than your nose
coming to your knees. This will help you keep your spine
long.
Keep the neck as the natural extension of your spine,
neither cranking it to look up nor letting it go completely.
When you have come to your full extension with the spine
long, decide whether you want to stay here or let your spine
round forward.
Take hold of your ankles or shins, whichever you can reach.
You can also use a strap around your feet. Keep your feet
flexed strongly throughout.
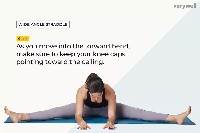
Instructions
-
Opening your legs wide creates a slightly different stretch
from Paschimottanasana.
Though it may look like the mandate is to bring your chest
to the floor, it's not about that. Instead, concentrate on
keeping your back flat, rotating the pelvis forward instead
of crunching forward through your spine, and keeping your
feet flexed. If you do all three of these things, it doesn't
matter how far forward you lean.
Separate your legs into a wide position.
Flex both feet and engage both the legs down strongly,
coming into upavistha konasana.
Forward bend to the center, extending the spine on your
inhales and deepening the pose on your exhales.
Instructions
-
You will need an exercise mat or a firm, padded surface. You
may want to support your neck with a small pad, pillow or
folded blanket.
Lie on your back and find a neutral spine position where the
natural curves of your spine are present but not
exaggerated.
Bring your knees toward your chest.
As you bring your knees up, keep your hip sockets soft
so that your legs come up but your hips stay down. Keep
your neutral spine with your tailbone on the mat.
Flex your feet and show the soles of your feet to the
ceiling.
Wrap your first two fingers around your big toes and pull
lightly down. Your feet stay flat to the ceiling but your
hips release allowing your knees to come closer to your
chest as you relax. You can also bring your hands up to the
outside of the foot and grasp the foot around the arch.
Take your time and breathe deeply. Enjoy the easy stretch in
your hamstrings.
Let your back relax into the floor—don't push it down, just
allow it to release naturally. Be a happy baby.
Instructions
-
You will need an area where you can lay out your yoga mat.
Lie down on your back.
Bend your knees and put the soles of your feet on the floor
with your knees pointing up toward the ceiling.
Press into your feet to lift your
hips slightly off the floor and shift them about an inch
to your right. This is an important step because it sets
your hips up to stack one on top of the other when you
move into the twist.
Exhale and draw your right knee into your chest and extend
your left leg flat on the floor. Keep your left foot
actively flexed throughout the pose. Inhale.
Exhale and cross your right knee over your midline to the
floor on the left side of your body. Your right hip is now
stacked on top of your left hip. You can hook your right
foot behind your left knee if you like.
Open your right arm to the right, keeping it in line with
your shoulders. Rest your left hand on your right knee or
extend it to make a T shape with the arms. Turn your palms
toward the ceiling.
Turn your head to the right, bringing your gaze over your
shoulder to your right fingertips. You can skip this step if
it doesn't feel good on your neck.
On your exhalations, release your left knee and your right
shoulder toward the floor.
Hold the pose for five to 10 breaths. To come out of the
pose, inhale and roll onto your back, drawing your right
knee into your chest. Release both legs to the floor to
neutralize your spine for several breaths before doing the
other side.
Spread your knees as wide as your mat, keeping the tops of
your feet on the floor with the big toes touching.
Rest your belly between your thighs and root your forehead
to the floor. Relax the shoulders, jaw, and eyes. If it is
not comfortable to place the forehead on the floor, rest it
on a block or two stacked fists. There is an energy point at
the center of the forehead in between the eyebrows that
stimulates the vagus nerve and supports a "rest and digest"
response. Finding a comfortable place for the forehead is
key to gaining this soothing benefit.
Stretch your arms in front of you with the palms toward the
floor or bring your arms back alongside your thighs with the
palms facing upwards. You can also stretch the arms forward
with palms facing up for a shoulder release or try bending
the elbows so that the palms touch and rest the thumbs at
the back of the neck. In this position inch the elbows
forward.
Stay as long as you like, eventually reconnecting with the
steady inhales and exhales of your breath.
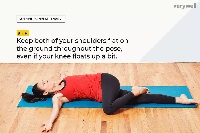
Separate your legs. Let go of
holding your legs straight so that your feet can fall
open to either side.
Bring your arms alongside your body,
but slightly separated from your torso. Turn your palms
to face upwards but don't try to keep them open. Let the
fingers curl in.
Tuck your shoulder blades onto your
back for support. This is a similar movement to tucking
the shoulders under in Bridge Pose, but less intense.
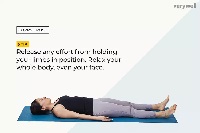
Once you have set up your limbs,
release any effort from holding them in position. Relax
your whole body, including your face. Let your body feel
heavy.
Let your breathing occur naturally.
If your mind wanders, you can bring your attention to
your breath but try to just notice it, not deepen it.
Stay for a minimum of five minutes.
Ten minutes is better. If you are practicing at home,
set an alarm so that you are not compelled to keep
checking the time.
To come out, first begin to the
deepen your breath. Then begin to wiggle your fingers
and toes, slowly reawakening your body.
Stretch your arms overhead for a
full body stretch from hands to feet.
Bring your knees into your chest and
roll over to one side, keeping your eyes closed. Use
your bottom arm as a pillow while you rest in a fetal
position for a few breaths.
Using your hands for support, bring
yourself back up into a sitting position.
 My
Yoga Workout
My
Yoga Workout